
Omega Arms Preacher Curl Attachment
Introduction
This design leverages the Omega Arms Foot Plate (which I taught you how to build in Episode 3 of The Omega Arms Series).
The beauty of this design is that if you build the Omega Arms Foot Plate (which has many other uses) – then you only have to build these two brackets to achieve a Preacher curl attachment.
Of course you could build a purposefully-designed Preacher Curl attachment that does not leverage the Omega Arms Foot Plate at all – and there are already many other videos on YouTube to teach you this. However, for me, versatility is very important since my Home Gym is so small. Therefore, being able to use this Foot Plate as a Preacher Curl attachment is great for me. This foot plate not just the base for the Preacher Curl Attachment, but it is also the:
Omega Arms Leg Press Foot Plate (Episode 3 of the Series)
Omega Arms Pendulum Squat Foot Plate (Episode 4 of the Series)
Omega Arms Inverted Leg Press Foot Plate (Episode 5 of the Series)
Resistance Band Platform (Band Box) (Episode 6 of the Series)
Utility Seat for executing MANY exercise such as the Leg Extension and the Leg Curl (Episode 8 of the Series)
Also – let me foot stomp this: It can be used for STANDING or SEATED preacher curls. If you want to use it for seated Preacher curls – just attach it lower on your rack and slide your bench over and voila!
Tutorial
Step 1: Attach to You Rack (with a ½” Nipple that is 36” long)
My rack has 1 1/16” holes. Most ¾” nipples will not fit in these holes, which is why I am using a ½” nipple. At the end of the nipple, I attached a 1/2” Tee connector just so it does not slip out when in use. However, you could also use a ½” Nipple cap, or a floor flange.
If your rack has 5/8 holes – you could use something else, such as a 5/8” threaded rod. Place one or two 5/8” nuts with threadlocker and washer on the rod – so that it does not slip out when in use. Alternatively, instead of 1 threaded rod - use two separate long 5/8” Bolts.
Step 2: Set Foot Plate to Desired Pitch.
I set mine at 45 degrees. Based upon my research, commercial products have pitch of 55 degrees to 45 degrees – so as long as your pitch is in this range you should be good to go. To determine pitch use a digital level, a digital angle finder, or an analog angle finder. The links to all these products are down in the shopping list below.
I used my adjustable bench to prop it up to get to my desired pitch.
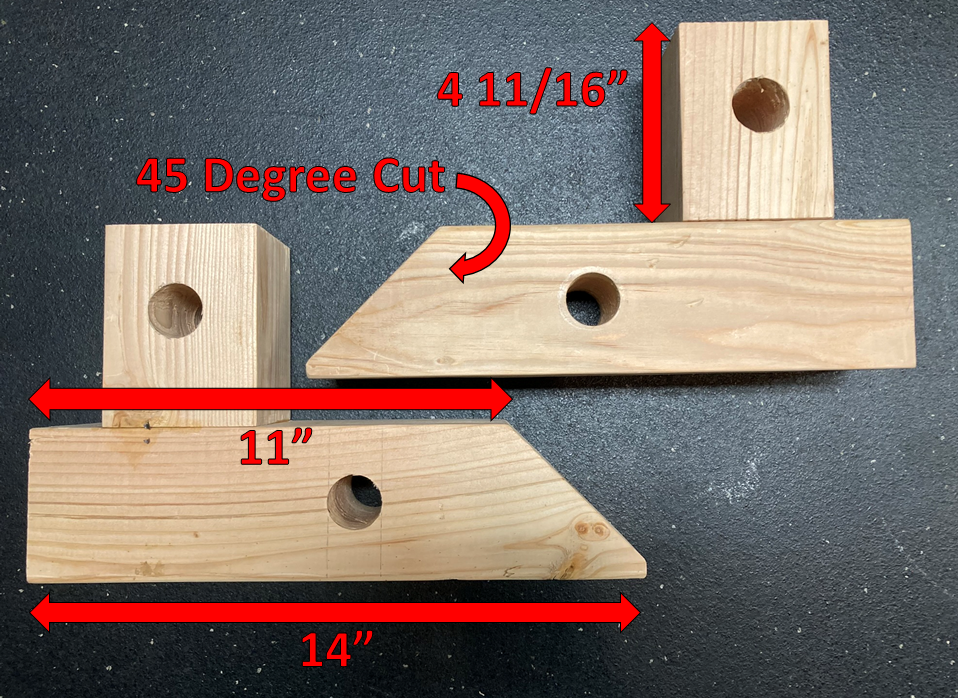
Step 3: Mark the Center line on a 14” long piece of 4x4.
Step 4: Clamp the 14” 4x4 onto the rack so that the center line is bi-secting the bottom hole of the Footplate. Once it is in place, trace the footplate’s bottom hole onto the 4x4. Links to clamps are down in the shopping list below.
Step 5: Trace the Pitch of the foot Plate onto the 4X4.
This marking will help orient you later when making a 45degree angle cut later (in STEP x), so that you do not accidentally cut the wrong end off of the 4x4.
Step 6: Drill 1 ¼” Hole into the 4x4 (where we just traced the position of the Footplate’s bottom hole)
For this step you can use a 1.25” Spade bit or a 1.25” Forstner bit.
I like using a 6” Spade bit for this step because it is long enough to go all the way through the 4x4. Having said that, Forstner bits usually result in cleaner holes with less splitting.
The problem with Forstner bits though is that the shank is not long enough to go all the way through a 4x4. Therefore, you have to make two holes and hope that they meet in the middle of the 4x4.
Whatever bit type you use – do yourself a favor – and use a SHARP bit.
Step 7: Make 45 Degree Cut 11” from the edge.
Using a Mitre saw is obviously the easiest way to make a 45-degree cut but use whatever tools you have at your disposal.
So why 11” from the edge? Because my original prototype was only 9” from the edge and it was way too short. So then I made some that were longer (approx. 13” from the edge) – and they were way too long. 11” from the edge worked best.
What I found out was that you cut them too long – two things happened:
You will not be able to rack/unrack the barbell easily because it will be too far away.
The 4x4s will interfere with the path of the barbell when exercising
Further, if you make them too short, two things happened:
Not have enough clearance for your fingers to rack and unrack the barbell. My fingers go smashed in between the footplate and the barbell.
The nipple and its nipple cap at the bottom of the footplate interfered with the plates on the barbell. Specifically, my prototype would not accommodate 25LBS plate. The nipple and its cap collided with 25lbs plates. Which is why I rebuilt them to be 11” from the edge.
Step 8: Make 2nd Identical copy of the 4x4
I used my first unit, to trace the length, hole position, and placement of the 45-degree angle cut onto the 2nd copy. They came out identical.
Step 9: Attach the two identical 4x4s to the Foot Plate With a 36” long ¾” Nipple (with ¾” Nipple Cap).
As I explain at the very end of the video – you can also use ¾” Schedule 40 PVC for securing the 4x4s to the Foot plate. This will eliminate any interference between the plates and the nipple/nipple cap. However, under most conditions using the ¾ nipple (with cap) was not a problem for me. I only experienced interference when I slouched.
Step 10: Cut a 4 11/16” 4x4 Block and then Mark the center line of the block.
Step 11: Place the 4 11/16” Block onto the larger 4x4s so that the center line bisects the Footplate’s center hole – and the trace the Hole position onto the block.
Step 12: Drill 1 ¼” Hole into the 4 11/16” Block (where we just traced the position of the Footplate’s middle hole).
Step 13: Make 2nd Identical copy of the 4 11/16” Block
Step 14: Sand the 4 pieces to smooth them out.
Step 15: Glue on the blocks.
Simply apply wood glue to the bottom of each block, and place them so that the holes in th block align with the middle hole of the foot Plate.
Then run another a 36” long ¾” Nipple (with ¾” Nipple Cap) through those holes. Alternatively – yes you can use ¾” Schedule 40 PVC here as well.
Run this nipple or PVC length will ensure everything is lined up properly.
Then ensure the edges of the blocks are flush with the edge of the 14” Long 4x4. Once everything is in place, clamp the blocks and allow 24 hours to dry.
Before Painting this is what it should look like:
Step 16: Paint.
Obviously, this is an optional step.
Step 17: Reinforce with Framing Angles
This step could also be considered optional. The fact is when a barbell is placed on the hooks, the weight of the barbell compresses the blocks onto the 14” long 4x4 – it does not pull them apart. Therefore, I think that just the glue might be sufficient. However, I still added these framing angles so that I can be a bit rougher with them – and over time they should hold up a little better.
I used 2” Construction screws for the holes going down vertically into the 14” long 4x4, and I used 1.25” Construction screws for going horizontally into the block (because If used screws that were too long here – the screws could get a little too close together inside the block and split the wood).
To make it look nicer – remove the stickers from the Framing Angles before affixing to 4x4s. I skipped this step because the stickers do not easily come off, and I was all out of adhesive remover (e.g., Goo B Gone).
Step 18: Attach Hooks.
Now if you use bigger hooks than this they could interfere with the barbell path. The hooks that I used are the strongest hooks that I could find that were also not too big. Therefore, if you use different hooks, you may experience a different result. The hooks that I used are here: https://amzn.to/3v7TKN5
I placed my right in the middle of the plane at the end of the 45 Cut on my 4x4s.
You could experiment with different vertical placement, but just be careful, if you place them too high, you could have interface between the 25 LBS plates and the nipple/nipple cap. If you place them too low, you will have to use very short screws on the bottom of the hook – or the screws will poke out through the bottom of the 4x4.
If you experiment with a non-centered horizontal placement, just be sure that you will be bale to easily rack/unrack whatever barbell(s) you plan to use.
Step 19: Attach Pad
In the video I showcased the Pure Fitness Preacher Curl Bench Replacement Pad. Unfortunately, I just checked and at the time of me writing this (Feb 2022) – they are sol out. The link is down in the Shopping List below. Check it for current availability. However, There are certainly other manufacturers for you to consider.
I actually really like using the Balance pad. It is just as comfortable as the Pure Fitness pad, and it obviously will offer more versatility.
SHOPPING LIST
🛍 🛒SHOPPING LIST WHEN SHOPPING, PLEASE CLICK FIRST TO SUPPORT THE CHANNEL: By shopping via any of these links, I get paid a small commission which helps support the Club’s costs such as Web Hosting the website.
SUBSTITUTES:
TITAN PREACHER CURL STATION: https://bit.ly/34VMSqP
TITAN PREACHER CURL BENCH v2: https://bit.ly/3v7Ypyz
TITAN Rack Mounted PREACHER CURL: https://bit.ly/3LxJXpj
AbMat Preacher Pad: https://bit.ly/3uWpaWn
GYM GEAR:
TITAN OLYMPIC CURL BAR: https://bit.ly/3LxTLzs
Power Rack https://amzn.to/3dUvUed
Dumbbells: https://amzn.to/3r1gFpn
Balance Pad: https://amzn.to/3g83fTG
Lashing Straps (2 PACK): https://amzn.to/3qdUpcW
Luggage strap: https://amzn.to/3sJFjeZ
Barbell clamps: https://amzn.to/3uRGbkp
Pure Fun Fitness Preacher Pad: https://bit.ly/34E3qUG
PLUMBING:
36” Long ¾” Galvanized Nipple: https://amzn.to/3HeAKiS
24” Long ¾” Galvanized Nipple: https://amzn.to/3AHtTfu
24” Long ¾” Black Iron Nipple : https://amzn.to/3ueKIgy
36” Long 1/2” Galvanized Nipple: https://amzn.to/34iE3a6
36” Long 1/2” Black Iron Nipple: https://amzn.to/3IOxgEk
3 / 4” Floor Flange: https://amzn.to/3klvoIk
3 /4” Nipple Cap: https://amzn.to/3CzkxlO
3 /4” Nipple Tee Connector: https://amzn.to/3hQD0Cw
1 / 2” Nipple Cap: https://amzn.to/3lYgTuR
1 /2” Tee Connector: https://amzn.to/3lVFgcI
3/ 4” Schedule 40 PVC: https://amzn.to/3LNy2Uv
TOOLS:
DEWALT COMBO PACK: Drill DCD791 & Impact Driver DCF887: https://amzn.to/3Bn1prD
Spade Bits: https://amzn.to/3nXRC6Q
Drill Bit set: https://amzn.to/3rPhzXE
Dewalt Compound Miter Saw: https://amzn.to/3AOTLGj
Dewalt Mitre Saw Stand: https://amzn.to/3KWpdXJ
Drill Press: https://amzn.to/3IOif5c
Drill Press Fence: https://amzn.to/3IOyVK4
Clamps: https://amzn.to/2SSnKeW
Speed Square: https://amzn.to/3hkLvFQ
IRWIN QUICK-GRIP Bar Clamp, 18-Inch: https://amzn.to/3oMkFdh
IRWIN QUICK-GRIP Bar Clamp, 24-Inch: https://amzn.to/3rN42A1
Digital Level: https://amzn.to/3gJIL3U
Digital Angle Finder: https://amzn.to/3LEnXZC
Johnson Angle Finder: https://amzn.to/3LxKBD4
1.25” Spade Bit: https://amzn.to/3LzQcJ8
1.25” Forstner Bit: https://amzn.to/3sGMhS4
Sander: https://amzn.to/3BnaOQ4
FASTENERS:
Spax 1.25” Construction Screw: https://amzn.to/3uShvbz
Spax 2” Construction Screw: https://amzn.to/3sIjCvX
Spax 2” Lag Screw: https://amzn.to/3sGFQyo
Framing Angles (USP A3-TZ): https://amzn.to/3Bo24cu
MISCELLANEOUS:
STORAGE HOOKS: https://amzn.to/3v7TKN5
Sand Paper: https://amzn.to/36kUVOR
Wood Glue: https://amzn.to/34Yd2sS
Spray Paint: https://amzn.to/3rREm5p
Once you try this for yourself - be sure to let me know how it worked for you! Happy Lifting!
SHOUT IT OUT: If you Build this project and want to brag about it, please use the #DesignBuildLift hashtag so that I can feature your amazing creation on my social media to help inspire others!